
This practical aims to achieve a few bigger goals so that we have more basic functionality from the ‘admin’ side of the application. We want to finish the ‘offering’ side of the travelagent models and views where we add ships to cruises and thus more complex models. We also want to generate names for ships and cruises using the faker gem so that we can seed the db, and start using Highcharts to create a dashboard as part of the admin side of the application.
Continuing with the travelagent
Our previous effort on the site left us with a few controllers, models and some views tied to the different models and controllers. This is all a good start, but we need to finish this so that we have cabins in the ships, and that ships are associated with different cruises.
Before you go any further it’s important that you’ve created some ships. If you haven’t, then the next steps will not work as you’ll be trying to refer to a collection of objects, which doesn’t exist.
Start your server, go to localhost:3000/ships and a few ships.
Step 1) We should finish our ships by adding cabins for our travellers. We only need a bit of detail here to specify how many beds it has, which deck it’s on, and which ship it’s on.The ‘ship:references’ part of the command will associate the cabin with a foreign reference to a specific ship. Run this command in your terminal.
rails generate scaffold Cabin name beds:integer deck:integer ship:references
run ‘rails db:migrate’
We should pause to explain the rails db:migrate command. This reads the migration file generated when we create a model and then issues appopriate SQL commands to create, modify, or destroy the table in the database we’re using.
When you start the server and go to the cabins at http://localhost:3000/cabins and add a cabin you’ll see that the form expects an integer to specify which ship the cabin belongs to. It’s a special bit of Rails magic, which is nice. But not very practical to know the ship ID. Happily, there’s a way to work around this.
After you run ‘bin/rails db:migrate’ you’ll see that the form for a new cabin also includes a space for the ship details. If you enter the ID of a previously created ship – you probably only created a few so put in a number between 1 and 3, as you’d expect. However, when you load the page you’ll get something like ‘#<Ship:0x007fca31f56628>’ which is a Ruby object reference, because we’re calling the wrong item in our code.
Step 2) Open the file travelagent/app/views/cabins/show.html.erb and find line 20:
<%= @cabin.ship %> and change it to <%=@cabin.ship.name %> and then refresh the page and you should see the last name of the ship whose cabin you created. This ‘magic’ works thanks to the relationship we created between the cabin and ship objects, and Ruby’s nice syntax for this sort of code. You can also do this for the travelagent/app/views/cabins/index.html.erb file too.
Step 3) We can clean up the ‘new cabin’ form so that we get the correct ship when we add a new cabin, without having to memorize the IDs of ships. Open travelagent/app/controllers/cabin_controller.rb and add this line to the ‘new’ method, and the ‘edit’ method:
def new
@cabin = Cabin.new
@ships = Ship.all
end
Then open travelagent/app/views/cabins/_form_html.erb and rewrite the <%= f.text_field :ship_id %> line:
<%= form.label :ship_id %>
<%= form.collection_select(:ship_id, @ships, :id, :name ) %>
Two words of warning:
First, If you end up with an error about “ActionView::Template::Error (undefined method `map’ for nil:NilClass)” then you have possibly used the wrong reference in your linking of tables.
Places to check where you might’ve gone wrong are in the ‘new’ and ‘edit’ methods of the controller, as well as check that you’re trying to use the correct <model>_id in the private params method of allowed attributes at the end of the controller file. You might also check the <model>.rb file if you used the wrong model in the reference and tried to ‘fix’ your error by changing the files. You can also use ‘rails db:rollback’ to undo a migration, then change the migration file to use the correct class, and then change the views, model, and controller and then reapply the rails db:migrate command.
Second, if you are using form.collection.select … , then Rails may throw a warning, and you can remove this by switching from form.collection… to f.collection.select… instead.
Third, if you’ve tried everything else, and the ‘map error’ persists, then you can also expand the ‘mapping’ of the objects for select statements so that instead of @ships you use Ship.all as in this example of rewriting the line from below for listing the ships used in cruises.
<em><%= f.label :ship_id %></em>
<%= f.collection_radio_buttons( :ship_id, Ship.all, :id, :name ) %>
The change to the controller sends an array of ships to the view, which we can then use to generate a select field for creating cabins. By the way, we don’t need the :ship symbol in our collection_select statement as that is taken care of by the ‘f’ because this is a ‘form for’ tag. You can find more about this and other options in the API for ActionViewHelpers::FormOptionsHelper and in the RailsGuides for FormHelpers.
We need to do one more thing before we finish. We need to setup the Cabin controller to add a @ships object for the ‘edit’ methods. Do the same here as you did with the ‘new’ method and you’re done.
None of what we’ve done for the cabins and ships is pretty. However, it does show us that we’re connecting objects together correctly, and letting us see how our objects are joined together. We’ll make this all pretty at a later stage.
Step 4) We can now move onto creating cruises for our ships. We want to be able to associate each cruise with a specific ship and its’ cabins.
rails generate scaffold Cruise name ship:references
As before we need to run the migration with:
run ‘rails db:migrate’
Make the changes to the travelagent/app/controllers/cruise_conroller.rb as you did with the Cabins. Add @ships= Ship.new to the ‘new’ and ‘edit’ methods as you did by adding @ships to the Cabin controller. This will let you show the collection of ships when creating a cruise.
Also make the changes to the index.html.erb and show.html.erb files too by adding ‘name’ to ‘@cruise.ship’ so that it becomes @cuise.ship.name and does not just display the class object.
Then, to show that you don’t always have to use a select box, we’ll use radio buttons to select the ship of the cruise. Open travelagent/app/views/cruises/_form.html.erb and change this line:
<em><%= f.label :ship_id %></em>
<%= f.collection_radio_buttons( :ship_id, @ships,:id, :name ) %>
We added the <em> tags so that visually a user can seethe label for different ship names.
Step 5) Now be sure to add in some cruises before going further to ensure that everything works smoothly.
Validate Forms
At the moment when people fill in the forms, these are open to a variety of errors because we have implemented no validation. We don’t check that all of the required fields are completed, nor do we check that what has been entered into the forms is ‘sensible’ (as in strings where strings should be, and integers where integers should be).
Step 6) This is easy to add in Rails. We only need to tell each model to check for the presence of various fields in the model. You need to specify the fields that need to be validated by adding in the line of code shown in bold below in the file travelagent/app/models/ship.rb. This will now ensure that the appropriate fields are completed by users.
class Ship < ApplicationRecord
validates :name, :tonnage, presence: true
end
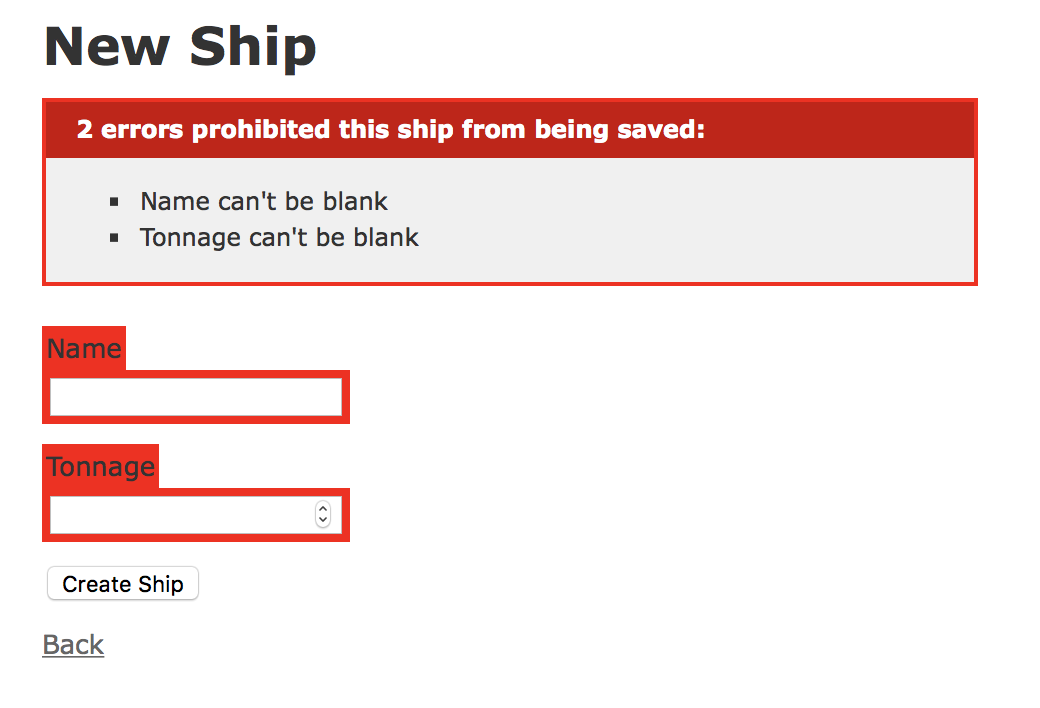
The form doesn’t like it when you don’t supply values for the fields.
Step 7) Now we’ve done all that we can for this class as it stands. Add validation for Harbours too. The validation for associated models that we have in cabins and cruises is more complex and won’t work in the same way due to our forms. Because we are using collections to populate our drop-down list, and radio button list, the form fails if not completed in full with the ‘undefined map’ error.
A solution to this is to put the code for the drop-down list in the view, which is not good as it means the view is reaching all the way back to the database to get the values instead of the controller sending the array of values to the view. If you put this in the view, then it will work:
<%= f.collection_radio_buttons(:ship_id, Ship.all, :id, :name ) %>
You will find more details about validation and how to checkfor min/max number of characters, and real email addresses, for example, at the Rails APIwebsite and in the RailsGuides for ActiveRecord.
Exceptions
Another way to harmonise the application is to sort out the exceptions so that error messages don’t get sent to the browser when the application is in production, but that instead sensible messages appear. We’ll just sort out whether the user is trying to call up an item from the cruises which don’t exist, and if so, then send them to the basic list and notify them that the cruise they are trying to access doesn’t exist.
Step 8) Open the app/controllers/cruise_controller.rb file and add this code in bold for the class under the class declaration.
class CruisesController < ApplicationController
before_action :set_cruise, only: [:show, :edit, :update,:destroy]
rescue_fromActiveRecord::RecordNotFound, with: :redirect_if_not_found
# GET /cruises
That’s all there is to it. The ‘rescue’ part says ‘if something goes wrong, then run the ‘redirect_if_not_found’ method. Which we’ll add next.
Step 9) We’ll put this ‘redirect_if_not_found’ method in app/controllers/application_controller.rb so to handle what happens when someone looks for a non-existent cruise.
class ApplicationController < ActionController::Base
protect_from_forgery with: :exception
def redirect_if_not_found
logger.error “Attempt to access non-existent #{request.controller_class}#{params[:id]}”
flash[:notice] = ‘Sorry, but that doesn\’t exist.’
redirect_to(cruises_url)
end
end
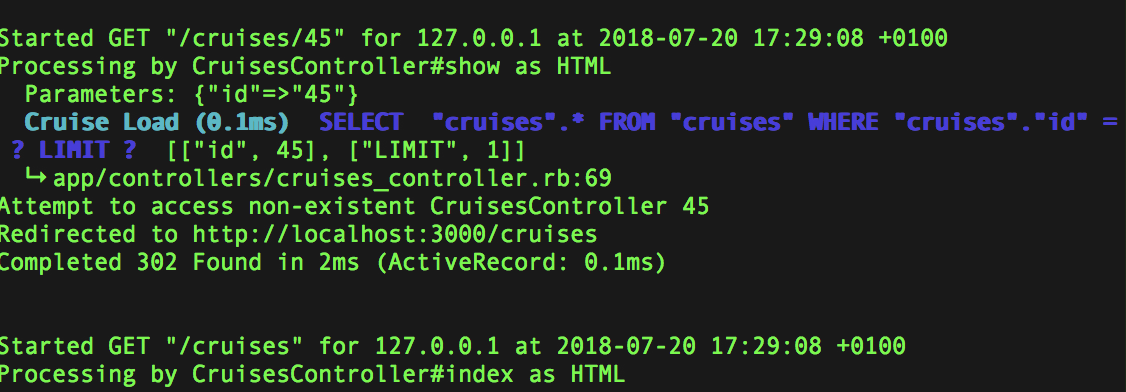
This logs the error so that we have an audit trail, and then redirects the user to the main cruise listing, which is all we need. It means they don’t get an error message for techies, but see something useful. You can find other details that you could log in the RailsAPI documentation. This takes you to the page for ‘requests’ and you’ll see method names like ‘controller_class’, which is what we use above.
Give it a try. See what happens when you go to http://localhost:3000/cruise/19. Then look in the travelagent/log/development.log, or the console where the server is running, and see what the error says.
This error message routine, or similar ones, should be added to all of the methods where users could otherwise encounter the standard ‘error screen’ that you see while debugging the application. A debug screen isn’t good for users though, so you need to set up appropriate error handling routines to deal with these issues. Otherwise they get a ‘something is wrong with the server’ type of message when it’s in production.
Step 10) Go add this line to the start of your other controllers for ships, cabins, reservations, etc.
rescue_fromActiveRecord::RecordNotFound, with: :redirect_if_not_found
Our code for the log is generic, and works fine for our purposes, plus we only have the error message in one location too, which is nice for maintenance. Ok, maybe we don’t always want people routed back to the cruises page when they encounter an error, but given the navigation, this should make sense for most errors.
You’ll realise, of course, that this doesn’t stop someone from seeing the details of someone else’s reservation, or other private details by changing the ID of the item they’re browsing through. We’ll get to that in due course.
Populating our App with Data using the Faker Gem
Ships can have hundreds or thousands of cabins and we don’t really want to add them all by hand. It would be much better to do this programmatically. We can also use this to generate random ship and cruise names too.
Seed the database using Faker Gem at https://github.com/stympy/faker You should look at the documentation for this too, if you find the methods for Number don’t work quite as expected.
Using Faker to seed the database
To use Faker we need to tell the app about by installing the gem, and then adding it to the Gemfile.
Step 11) We install Faker onto our system with the ‘gem install faker’ command in a console.
Then open the ‘travelagent/Gemfile’ and add the line in bold to the development and test group.
group :development, :test do
# Call ‘byebug’ anywhere in the code to stop execution and get a debugger console
gem ‘byebug’, platform: :mri
gem ‘faker’
end
As we edited the Gemfile we should also stop and start the server so that and classes, which need Faker will find it. We now need to update the change in the gemfile with bundler and now we’re ready to go. Use this command to update ourapplication to include faker:
bundle update
Step 12) We’ll generate a task file for generating seeds for the database with the command:
rails g task ships seed_cabins
Here the ‘g’ is a shortcut for generate. Open the file, which you’ll find under travelagent/lib/tasks/ships.rake and add the lines in bold
namespace :ships do
desc “TODO”
task seed_cabins: :environment do
#create the ships
5.times do |index |
Ship.create!(name: Faker::Coffee.blend_name,
tonnage: Faker::Number.within(range: 10000..100000)
)
end
p “ships created”
end
end
Step 13) The code creates five ships for us using auto generated names from Faker, and then prints out ‘ships created’ in the console. Run this with the command
bin/rake ships:seed_cabins
This should run with no problems. Go look at your list of ships now and you should fine a number of new ones added.
If you get the error ‘rake aborted! Don’t know how to build task …’ then you can see all of the tasks rake knows about with the command
bin/rake -T
It could be that your rake file isn’t in the lib/tasks folder, which is where it needs to be for rake to find it.
You’ll see that we’re calling the namespace and then the task name. So that we don’t need to keep deleting ships manually as we build up this file and run it again and again, we should remove the data from the ships table before we run this code. However, in order to remove the ships, we have to first remove any references to them in the cabins, and cruises. If we don’t then we’ll run into foreign key constraint errors. Put this new code in the file too.
task seed_cabins: :environment do
#remove the data from the tables before creating new data
#this ensures we have no stray references to objects that no longer exist
Cruise.destroy_all
Cabin.destroy_all
Ship.destroy_all
p “tables emptied”
#create the ships
Step 14) With ships in place we can now add cabins to the ships with this code. As before we use Faker to generate the data for us. The suite number is taken from the value of ‘index’ each time it goes around the loop, while the beds and deck are random between the values of 1 and 3.
p “ships created”
#create cabins for each ship
ships = Ship.all
ships.each do |ship|
5.times do | index |
Cabin.create!(
ship_id: ship.id,
name: “Suite #{index+1}”,
beds: Faker::Number.between(from: 1, to: 3),
deck: Faker::Number.between(from: 1, to: 3) )
end
end
p “cabins created”
This should run ok. Notice too, that we nested one loop to create the cabins inside of a loop of the ships.
Step 15) With cabins on the ships we can now generate cruises for our ships with this code. This is similar to the cabins with nested loops so that each ship has two cruises. The names of cruises make use of the ‘capitalize’ method in Rails to capitalise the generated word for our cruise.
p “cabins created”
#create cruises using the ships
# the rails capitalize method does just that to each word
ships = Ship.all
ships.each do |ship|
2.times do | index |
Cruise.create!(
ship_id: ship.id,
name: Faker::Hacker.adjective.capitalize + ” ” +Faker::Hacker.noun.capitalize+” Cruise”
)
end
end
p “cruises created”
We’ve now done all that we need with faker for now. If you want to use other sources to create the names of cruises and ships, then go look at the documentation for Faker in the link above.There are a wide range of book, movie and TV sources to draw upon.
You can find more about using seeds at https://davidmles.com/seeding-database-rails/.
Creating a Dashboard with HighCharts
We’ll use Highcharts, a JavaScript library, which lets you create interactive charts, maps and graphs available at https://www.highcharts.com.
Because we’re doing this with Rails 6 and Webpacker, we need to tell the application how to handle the javascript. Note the yarn install command below uses 2 dashes, then a hyphen between the two words.
Step 1: In a terminal enter these three commands to ensure you have all of the right components:
yarn add highcharts
yarn add jquery
yarn install –check-files
Step 2: in config/webpack/environment.js —- make it look like so
const { environment } = require(‘@rails/webpacker’)
const webpack = require(‘webpack’)
environment.plugins.append(‘Provide’,
new webpack.ProvidePlugin({
$: ‘jquery’,
jQuery: ‘jquery’,
})
)
module.exports = environment
Step 3: in app/javascript/packs/application.js – you should already have some of this, but add anything that’s not there.
require("@rails/ujs").start()
require("turbolinks").start()
require("@rails/activestorage").start()
require("channels")
import Highcharts from ‘highcharts’;
window.Highcharts = Highcharts;
Step 4: Open the package.json file in the root of the application. It should be next to your Gemfile. It should have some of this already. Add the rest if it’s not there.
{
  "name": "travelagent",
  "private": true,
  "dependencies": {
    "channels": "^0.0.4",
    "@rails/activestorage": "6.0.3-3",
    "@rails/webpacker": "4.3.0",
    "@rails/ujs": "6.0.3-3",
    "highcharts": "^8.2.0",
    "jquery": "^3.5.1",
    "turbolinks": "^5.2.0"
  },
  "devDependencies": {
    "webpack-dev-server": "^3.11.0"
  }
}
We now need to update the yarn.lock file by running the yarn command from above: yarn install –check-files.
Step 5: Open the app/views/layouts/application.html.erb file and confirm that you have javascript_pack_tags. If they are ‘javascript_link_tags’, then change them. This will ensure that the app uses webpacker.
Stop and start your server again before moving onto the next step. We need to do this in order to ensure that these changes to the asset pipeline take effect. how the application deals with javascript, css and other assets that should be concatenated before being delivered to the browserRead the Asset Pipeline Guide to learn more.
Step 20) Now, open app/views/travelagent/index.html.erb,which should be fairly empty at this point.<h1>Travelagent dot com</h1>
<p>Find us at the Meston Building</p>
Next we need to add in the basic CSS for the ‘div’ which will display the chart we’re going to generate.
<p>This is the info you need to know as admin</p>
<div id=”container” style=”width:100%;height:400px;”></div>
Now we add more ‘script’ tags to hold the javascript, which will call the Highchart file loaded earlier.
<script type=”text/javascript”>
document.addEventListener('DOMContentLoaded',function(){
var myChart = Highcharts.chart('container',{
chart: {
type: 'bar'
},
title: {
text: 'Fruit Consumption'
},
xAxis: {
categories: ['Apples', 'Bananas', 'Oranges']
},
yAxis: {
title: {
text: 'Fruit eaten'
}
},
series: [{
name: 'Jane',
data: [1, 0, 4]
}, {
name: 'John',
data: [5, 7, 3]
}]
});
});
</script>
You can now run the file as it is from http://localhost:3000/travelagent/index and you’ll see a nice chart all about fruit. This is nothing fancy, but more than we have now. You’ll see that the data is embedded in the file above for each person. Our next step is to swap the embedded data for arrays of data that match our bookings.
There’s no chart…
If you don’t have a chart, then view the source of the webpage. You should check your files with those in the GitHub repo for the travelagent.
You should also confirm that you have (a) updated the packages.json file, (b) ran ‘yarn install –check-files’ (without the quotation marks) from the command line to update the yarn.lock file, (c) and that you start and stopped the server. You possibly forgot one of these steps.
Use chrome, safari, or firefox developer tools to debug this further.
These developer tools let you ‘see’ what javascript is there, and that the correct files and libraries are being loaded by webpacker. If you see something is missing, then repeat the steps to add the component to webpacker, and then rerun the command: yarn install –check-files to finish before you stop and start the server again.
Step 21) If the chart is showing, then we can go through the index file and change titles to what we need: Fruit Consumption becomes ‘Cruise Bookings’ and Fruit Eaten becomes ‘Cabins Available’. Then we want to change the data points as well as the categories so that we see cruises, plus cabins available and cabins booked. Change the labels now.
Step 22) Open up app/controllers/travelagent_controller.rb and check the index method. Our first step is to have the names of cruises appear instead of the names of fruits.
To do this we gather all of the cruises and then put the names of cruises into an array, which we then load via javascript.
def index
@cruises = Cruise.all
@cruise_names = []
@cruises.each do |cruise|
@cruise_names <<cruise.name
end
end
Step 23) We now need to modify the index.html.erb fileby changing a line of code there.
xAxis: {
categories: <%=raw @cruise_names %>
},
This sends the raw values of the array to the file. If you leave off ‘raw’ then you’ll find the UTF values of the quotes, and a blank where the chart should be seen.
You should now be able to run this and see the first three names of your ten cruises. We only see three as we still only have three data points.
Step 24) Our next step is to gather up the values of cabins per cruise. This demands some nice SQL to count the number of cabins per ship and then keep those in the same order as the categories. We do this in the controller so that we only send the values needed to the view for visualisation.
Add this code to the controller:
class TravelagentController < ApplicationController
def index
@cruises = Cruise.all
@cruise_names = []
@cabins_available = []
@cruises.each do |cruise|
@cruise_names <<cruise.name
end
@cabins =Cabin.group(:ship_id).count
@cabins.each do |group|
@cabins_available <<group[1]
@cabins_available <<group[1]
end
puts @cabins_available
puts @cruise_names
end
end
Step 25) We put the @cabins_available << group[1] twice so that we have ten items in the array to match up with the ten cruises available. We can now go back to the index.html.erb file and change the relevant labels and data values.
series: [{
name: ‘Cabins Available’,
data: <%=raw @cabins_available %>
}, {
name: ‘Cruises’,
data: <%= raw @cruise_names %>
}]
Step 26) Ok this works, but we have lots of fractions of cabins being booked, so let’s make one last change by adding this line:
text: ‘Cabins Available’
},
tickInterval: 1
},
Don’t forget the comma at the end of the line before tickInterval.
There you have it. A dashboard, which will change as cabins are booked on cruises. You can also see how you could display many other types of data too by exploring the Highchart examples.
The start of a dashboard, which we can modify to include bookings later. You can also see how you could display many other types of data too by exploring the Highchart examples.
This example illustrates the basics of using Highcharts in a basic manner. They are not that complicated, and the examples in the download should see you through most situations. You’ll also see that there are gems, which help you use them too, which you may want to also explore.
If you want to see how you can refactor this further, then look at the RubyPlusHighcharts example, which separates out the JS functions and options using the same fruit example that we also used. The main other difference is that we put the JQuery and Highcharts files in our apps.
Beyond the Practical
Assuming that you might still have some time left, do start work on the CSS for your site and thinking about other functionality for it.