
The practical shows you how to use Cucumber, RSpec andCapybara tests in Rails to ensure that your web application works correctly. This will walk you through a number of scenarios, but can really only scratch the surface of the subject.
The Big Picture
Cucumber, RSpec and Capybara are part of Behaviour DrivenDevelopment, and as such is something you should do with clients as discussed by Liz Keogh’s BDD Tutorial slides – which are great for explaining the reasons and background of BDD and on how to transition from TDD to BDD. You should also read Rachel Davies’s post on BDD in a Nutshell, which explains about the roles people have in the BDD process.
If it feels like lots of tests, or steps keep failing, then remember this:
By failing lots, we also prove that what we are doing is the correct step at that point because our work makes the tests pass.
You will also need to look at the CucumberWiki, the Capybaraexamples, and the Capybara ‘cheat sheet’ for DSL examples of how to manipulate web page elements.
As we’re sorting out the test structure ourselves we need to modify the Gemfile to add RSpec and Cucumber before we bundlethe app together.
Step 1) Open and change the Gemfile to include a section like the one below. You’ll find a commented out section like this at the end of the file. You can uncomment that and swap Webrat for Capybara.
This ‘group :test’ structure tells Bundler that these are only for testing so these Gems won’t be pushed to the production server. Add the bold lines as before. You should find that you already have these ‘groups’ in your gemfile, and that the ‘chromedriver-helper’ gem is already included too. Just leave it there. That’s fine.
# gem ‘capistrano-rails’, group: :development
group :test do
gem ‘cucumber-rails’, :require=>false
gem ‘database_cleaner’
gem ‘capybara’
gem ‘selenium-webdriver’
gem ‘factory_bot’
gem ‘chromedriver-helper’
end
group :development, :test do
# Call ‘byebug’ anywhere in the code to stop execution and get a debugger console
gem ‘byebug’, platform: :mri
gem ‘rspec-rails’
gem ‘faker’
end
Capybara is a gem to enable browser testing from the command line and database_cleaner keeps your test database nice and tidy between tests. Cucumber uses it seemlessly behind the scenes so you don’t need to do anything with it except include the gem.Factory_bot lets us use the database in a test mode without having to write lots of ActiveRecord code, so we can easily change things as we go along. You can find more about using factory_bot gem and how it works with your model.
Step 2) You can now run the command in your console
bundle update
Step 3) We need to tell the app that we want to use the RSpec artifacts for our testing.Put this into your console:
rails generate rspec:install
If you get an error like: Could not find generator ‘rspec:install’ then use the command ‘spring stop’,and then run the rspec:install command again.
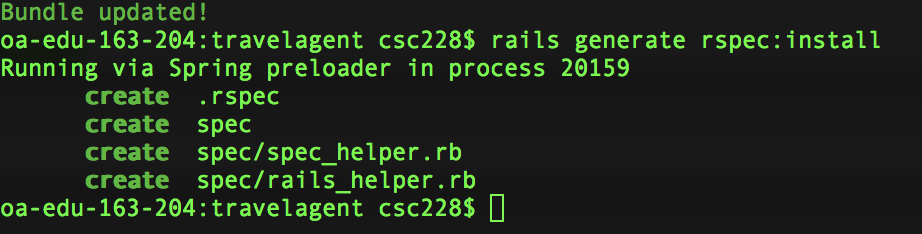
This will generate a few folders and files for you to use. We also want to be able to run ‘rspec’ command as is without having to run a longer command.
Step 4) depending upon your platform, this next step may not be needed. You can check whether it’s needed by trying the command ‘rspec’ in the terminal. If the command is known, then fine. If it’s unknown,then run this command:
bundle binstubs rspec-rails
This will generate stub files in your apps bin directory for you to use. You’re now ready to add a new file to run some tests.
Step 5) Create a new folder under travelagent/spec called ‘integration’ and then create a file under travelagent/spec/integration called’create_customer_spec.rb’. You should note that rspec files, by convention, end with _spec so that it’s clear it’s a test file.Enter this code in the file:
require ‘spec_helper’
require ‘rails_helper’
feature ‘create customer’ do
scenario “can create customer” do
visit’/customers/new’
expect(page).tohave_content(‘Add a New Customer’)
fill_in ‘First name’,:with=>’Sharon’
fill_in ‘Last name’,:with=>’Harrison’
fill_in ‘Has goodcredit’, :with=>1
click_button ‘CreateCustomer’
expect(page).tohave_content(‘First name: Sharon’)
expect(page).tohave_content(‘Last name: Harrison’)
end
end
Step 6) Then you canrun this with the command ‘rspec’ (or ‘bundle exec rspec’) and part of the tests should pass. It will fail with the mysteriou smessage:
1) create customer can create customer
Failure/Error: expect(page).to have_content(‘Add a New Customer’)
expected to find text “Add a New Customer” in “Find a Cruise Make a Payment New Customer Firstname Lastname Has good credit Paid Back”
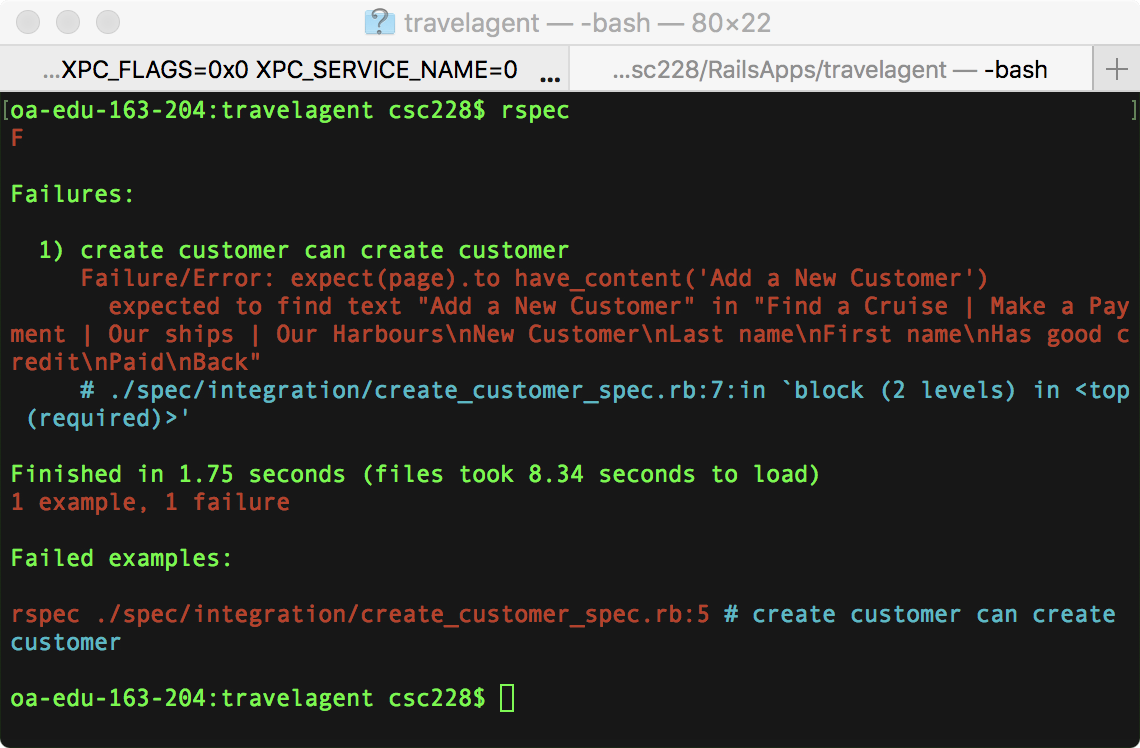
Step 7) As the error says, all it sees is the content noted, and ‘Add a New Customer’ should say only ‘New Customer’ in our test. Fix the line and it should now pass.
If you reload the localhost/customers page you’ll not see the new customer though, so what’s going on?
Everything is running via the test server, so this doesn’t affect your actual database, but does let you check that everything works correctly. You can also see that this runs faster than if you created a customer by hand.
Step 8) Now we should check for what happens if we create an ’empty’ customer. Add this new code:
expect(page).to have_content(‘Lastname: Harrison’)
end
scenario “can create customererror” do
visit’/customers/new’
expect(page).to have_content(‘New Customer’)
click_button’Create Customer’
expect(page).to have_content(‘Error’)
end
Oh oh. It failed:
![]()
Failure/Error: expect(page).tohave_content(‘Error’)
expected to find text “Error” in “errors prohibited this customer from being saved:\nLast name can’t be blank First name can’t be blank Has good credit can’t be blank\nLast name\nFirstname\nHas good credit\nPaid\nBack”
Step 9) Now we see why we added the validation code to the model. This catches errors for us. This is why we create tests. We can now change the test to confirm the error message is there and then the test will pass. Change ‘Error’ to ‘errors prohibited this customer from being saved’ and it should now pass.
Step 10) Now it almost works. Change expect(page).to have_content(‘Error’) to check for’First name can\’t be blank’ and it should now pass. (You need the backslash to escape the ‘ in can’t.)
Validating tests against browsers
That’s it. You now have a working scenario. Very simple, and easy to set up and use, even for coursework. Now we need to add one more group of items. At the moment your tests are running against the model of a browser, instead of against a real browser. It would be better to run our tests using a real browser, as this would also enable us to test Javascript too. In addition, this will also allow you to launch an instance of Firefox to show you what is happening in the test. This is a nice extra, and lets you see how your test is being implemented. In order for this to work you need to install Firefox.
Step 10) Download and install Firefox if you haven’t already installed it. Then download the Geckodriverfor your system and add it to your $PATH variable. On my Mac geckodriver goes under /usr/local/bin after unbundling it from the tarfile, and then created the .profile file, which I put in my home directory of /Users/<myaccountname> and added these lines to the file:
#profile for setting $PATH variable
PATH = $PATH:/usr/local/bin
Step 11) Open your travelagent/spec/spec_helper.rbfile and add this code ahead of the RSpec.configure line – you don’t need that in twice – to make use of theselenium-webdriver.
require ‘capybara’
# uncomment default driver line, & comment outregister block # for firefox
# � otherwise headless from command line
Capybara.default_driver = :selenium
#Capybara.register_driver :chrome do |app|
# Capybara::Selenium::Driver.new(app, :browser=> :chrome)
#end
Capybara.javascript_driver = :chrome
#
# See http://rubydoc.info/gems/rspec-core/RSpec/Core/Configuration
RSpec.configure do |config|
The above code is set up to run with Firefox using your local Puma server, which it starts for the tests. When you run ‘rspec’ now it will launch Firefox and you’ll see your pages load and the tests run while you watch.
Step 12) Run ‘rspec’ and see it launch the puma server and then launch Firefox to run your tests and then shut everything down again.
This is fine for small apps, but gets slow as your app grows, so you can swap the commented lines around so that you run chrome in the background (assuming you have chrome installed).To run chrome comment out the default_driver = :selenium line and uncomment the following three lines that register Chrome.
Step 13) Switch back to using Firefox for a while, so that you gain a feel for how this works as we continue with coding and testing the rest of the practical. Then switch to using Chrome which you’ll find runs much faster.
Capybara a simple way to move around a site checking pages as you go along to fill in forms and ensure that the pages have what you expect them to have. In the rest of the practical we’ll see how this works in practice.
Improving the Customer page
A better customer page would have us create a customer, and then associate that person with an address, which we could enter, and then let us add their credit card details too. We can do that now using a ‘test first approach’ using the BDD system we just put in place. While we do this we can also learn more about table relationships in Rails.
When we created our customer we didn’t tell it anything about the other models as we created it first. We now need to tell it about its associated models. We’ll do this slowly.
We will add all of the remaining test code to the first scenario where we create a customer. We’ll do this because each scenario is run independently. If we created a customer in one,an address in another, and a credit card for the customer in separate scenarios it would continually fail as the address and credit card scenarios wouldn’t know about the customer created in the other scenario. Therefore we’ll add the address and credit card to the customer so that we can use the customer data to seed the other two models.
Has_one relationships
Step 1) Open the travelagent/app/models/customer.rb file so that we can add an’has_one’ statement so that Rails knows each customer ‘has_one’address. When we generated the address we referenced it to the customer with a foreign key. Now, we need to generate the other side of the relationship. Add the code for ‘has_one :address’ to the customer and confirm the ‘belongs_to :customer’ is in the address.rb file.
class Customer < ApplicationRecord
validates :last_name, :first_name,:has_good_credit, presence: true <span style=”font-weight: bold;”>
has_one :address
end
class Address < ApplicationRecord
belongs_to :customer
end
Be sure that you have the space BEFORE the colon and not after it, as the : signifies that the word which follows is an instance. That should be :address and :customer in the code above.
Step 2) So far, so good. Now we need to modify the app/view/customer/show.html.erb file so that when we want to see all of the details of a customer, we can also see the person’s address. Open up the file in an editor, and you’ll see that there isn’t a lot there. Most of the work is done by the lines that display the details of the customer, which have been passed to the page by the controller.
In order to show the Address instance that is tied to the Customer model, we need to add some code. As there is only one address for each customer we do not need to worry about loops.The code below will display the address for each associated customer.
Step 3) Add this code after the code for ‘Paid’.
<p> <b>Address:</b>
</p>
The code is straight forward. The #{expression} syntax in Ruby (remember Rails is just the Ruby framework that we’re working with) interprets the value of the ‘expression’ within the#{…}, and this can be as complex as we need it to be. Here we’re using it to retrieve the values of the components of the customer’s address.
Step 4) We now need to test that this works correctly. We can modify our tests to check for ‘Address’ as we’ve not yet made a test to input the person’s address. So just add the line in bold to our current ‘create_customer_spec.rb’ file:
expect(page).tohave_content(‘Address’)
end
Run the test with ‘rspec’ and … watch it fail. The code is looking for values of our customer’s address, which we don’t have.We can fix this by associating each customer automatically with an address when we create the customer.
Save and Create Objects
One aspect that we’ve ignored so far is how to manage the creation and saving of new objects that are tied to our relationships. As things now stand, we have a mess on our hands whenever we modified something. Everything is fine for showing what’s there, but they’d get messed up as soon as we started creating new rows in our database. This is because we’re not using the full extent of the relationships in the different controllers that manage the models.
In order to do this we need to dig into the code for the different controllers so that objects are created, and the instances saved to our database at the correct time with the correct <model>_id. Done correctly everything falls into place, and we can create new customers with their new addresses and new credit cards for example.
Add and edit an Addresss
Step 5) Open customer_controller.rb in and look at the code for the ‘create’method. Ignore the bold code for now.
def create
@customer = Customer.new(customer_params)
respond_to do |format|
if @customer.save
@customer.create_address!
format.html {redirect_to @customer, notice: ‘Customer was successfully created.’ }
format.json {render :show, status: :created, location: @customer }
else
format.html {render :new }
format.json {render json: @customer.errors, status: :unprocessable_entity}
end
end
Notice how the application first creates an instance of customer using the params supplied by the form, and then tries to save it. If this is successful, then we are redirected to the ‘show’ page of the controller with a message that all went well, otherwise, if ‘save’ failed, then we’re invited to try filling in the form again.
The new code in bold adds another step to the ‘create’ operation. This creates a new address instance and then saves it to the database with ‘save’. Lastly, it assigns this new address to the newly created customer instance. The customer.id is used as the customer_id in the address automatically for us.
Step 6) You’re probably wondering when we add the details of the customer’s address. The @customer.create_address! only puts in an empty address. This is a ‘bang’ method with the ‘!’ as it forces it to be called. If we didn’t use the bang version, then we’re not sure that it’s called in time fo us to also call the edit method below when we need it and we might end up with a ‘nil for customer.address.id’.
So.. we create an empty address for the customer at this point.As our newly created customer ends on the ‘show.html.erb’ page, all we need to do is add an ‘edit’ link to take us to the address editing form from the customer show page, from where we can then add the customer’s correct address. We can do that with code like this, which you can add this right after where it says’Address’ from the earlier step:
<%= link_to ‘Edit Address’, edit_address_path(@customer.address.id ) %><br>
This code should look familiar to you. We’re creating a link to the ‘edit’ action of the ‘address’ controller, and we’re passing in the address_id of the customer so that the form knows which address we want to edit.
Step 7) With this in place we can now add some more to the rspec file to use the above link and then add code in bold to add the customer’s address like this:
expect(page).tohave_content(‘Address’)
#add the addressfor the customer
click_link’Edit Address’
expect(page).to have_content(‘Editing Address’)
fill_in’Street’, :with=>’4 High Street’
fill_in’City’, :with=>’Dundee’
fill_in’Postcode’, :with=>’DD2 4PS’
click_button’Update Address’
expect(page).to have_content(‘Customer: Harrison’)
end
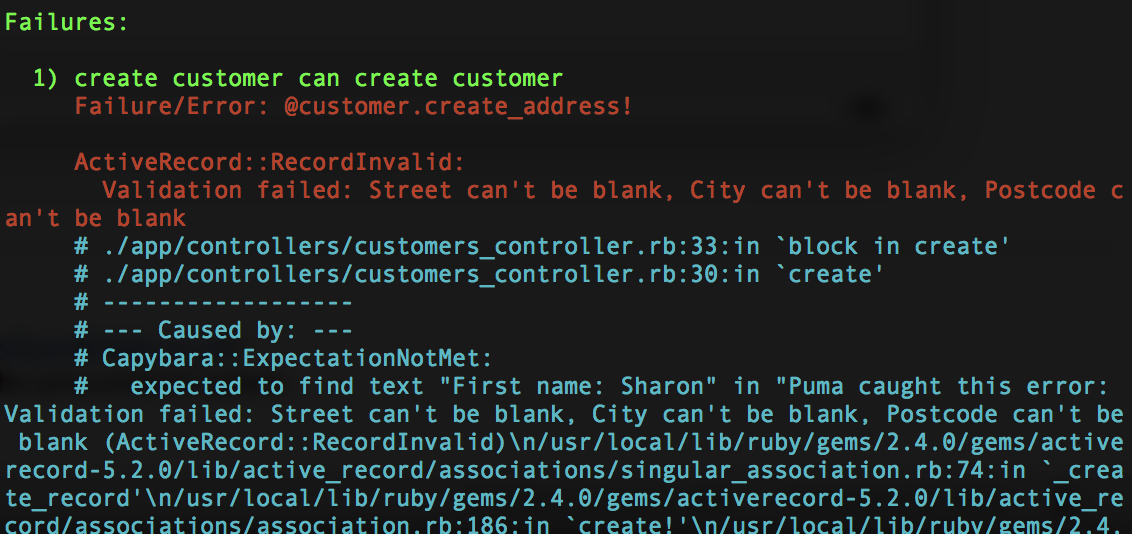
Now run ‘rspec’ again to see that this works. Remember, when building with tests we want to work in small steps.
Oh oh. This doesn’t work. You’ll get an error as the validation we put in place fails ‘Street can’t be blank. City … Postcode …’. Oops. We could go remove that validation on this model, but then we’d lose the validation. A better option would be to add ‘other data values’ to create an address that remind us that it is obviously the ‘wrong’ address, which we can then correct in a later step.
Step 8) Change the@customer.create_address! line the in the customer controller tothis, which will create a new ‘wrong’ address’ for each customer:
@customer.create_address!(street: ‘the wrong place’,
city:’someplace’, postcode: ‘XY1 2YX’)
This will create a ‘wrong’ address for all customers, which we can correct. Run ‘rspec’ again and it should now work.
Step 9) However, this will leave us on the ‘show address’ page for the customer. That’s now so useful when we’re working with customers. A better version would have us move back to the customer ‘show’ page after we edit an address. We can do that by adding a few lines to the addresses_controller.rb file. Look at the ‘update’ method as shown below. The new code is in bold, and will need to be worked around the formatting options.
def update
respond_to do |format|
if@address.update(address_params)
@customer =Customer.find(@address.customer_id)
format.html {redirect_to @customer, notice: ‘Address was successfully updated.’ }
format.json {render :show, status: :ok, location: @address }
else
format.html {render :edit }
format.json {render json: @address.errors, status: :unprocessable_entity}
end
end
end
The Customer.find line retrieves the customer associated with the address and creates the correct customer instance. There direct_to is changed from @address to @customer to point us back to the correct ‘show’ page for the customer after we’re done editing the address. We now need to test that this works correctly.
Step 10) Change the line in the rspec file from ‘Customer: Harrison’ to expect(page).to have_content(‘Last name: Harrison’)confirm we land on ‘show’ customer page.
Give it a go by running ‘rspec’ and you’ll see this works.
Step 11) We can now check how to show the customer address on the ‘show’ page too by adding this code in bold and then adding a few lines to test it appears correctly:
<%= link_to ‘Edit Address’, edit_address_path(@customer.address.id ) %><br>
<p> <b>Address:</b>
<%= “#{@customer.address.street}” %>,
<%= “#{@customer.address.city}” %>
<%= “#{@customer.address.postcode}” %>
</p>
Step 12) We can add these lines to test that it works:
expect(page).tohave_content(‘Last name: Harrison’)
expect(page).to have_content(‘Dundee’)
Run it with ‘rspec’.
Now that we know the customer is associated correctly with one address we need to ensure that they can have a range of credit cards to buy our cruises. This will be similar to what we did with the address, but also slightly different as it’s a multiple relationship.
Has_many relationships
One-to-many relationships are not much different in the coding than the one-to-one relationships. The biggest difference is inhow we retrieve the values to display on the web pages. But first we need to tell the models about their relationship.
Step 13) Go back to thecustomer.rb file and modify it to show that it has_manycreditcards as shown in the code below. Similarly in the creditcard.rb file we need to add some code to show that it belongs_to the customer class. So add both of the lines as shown in bold below in the respective files:
class Customer < ApplicationRecord
has_one :address
has_many :credit_cards
end
class Creditcard < ApplicationRecord
belongs_to :customer
end
As before these two lines (one in each class) specify the relationship and Rails will do the rest of the work for us.
Step 14) We now need to have the travelagent/app/view/client/show.html.erb file show the many credit cards that our customers might have.
We can start this with code like this as shown below to create a placeholder for the cards to appear later – remember to place it after the code for the address and before the link_to ‘edit’ and ‘back’ lines of the customer:
<p><%= link_to ‘Add a Credit Card’,new_credit_card_path(:customer_id => @customer)%></p>
<p>
<b>Credit Cards:</b> </p>
With this we can now add some code to create a new credit card instance that is associated with the customer.
This will generate a link to create a new credit card and set the customer_id parameter for us in the form. As part of the link we need to pass the form a variable telling it which customer the card belongs to.
Step 15) We can add a line to our test in the create_customer_spec.rb file to check that this appears as it should:
expect(page).to have_content(‘Dundee’)
expect(page).to have_content(‘Add aCredit Card’)
This test should pass when you run ‘rspec’.
Given that we know who the credit card is for, we should change the form which we use to create a new credit card. Open travelagent/app/views/credit_cards/_form.html.erb. We need to change what is shown in the :customer_id field.
We now need to modify the controller for the credit card so that it connects the card with the customer.
Step 16) Inside the travelagent/app/controllers/credit_cards_controller.rb file we need to modify the ‘new’ method so that we retrieve the correct instance of the customer. We change the code we had before which was there to pull up all possible customers. Now that we know the customer when we create the card, we can be more select about how we create a card.
Knowing the customer_id we can pass the correct parameters tothe ‘create’ method as you see in the code further below.
Step 17) The bold code should be added so that the card knows its owner, and theredirect needs to be changed from @credit_card to the @customer.
def new
@customer =Customer.find(params[:customer_id])
@credit_card =CreditCard.new
@credit_card.customer_id =@customer.id
end
other code ….
def create
# because we’ve changed the date we need to modifythe create method to pull paramaters from the form
@credit_card =CreditCard.new(credit_card_params)
@credit_card.exp_date =params[:exp_date][:year].to_s + “/” +params[:exp_date][:month].to_s
respond_to do |format|
if @credit_card.save
@customer =Customer.find(@credit_card.customer_id)
format.html {redirect_to @customer, notice: ‘Credit card wassuccessfully created.’ }
format.json {render :show, status: :created, location: @credit_card }
else
format.html {render :new }
format.json {render json: @credit_card.errors, status::unprocessable_entity }
end
end
end
You should already recognise that this code is finding our customer based on the customer_id and creating an instance of the person, and then save the credit card details. Lastly, we then send the browser back to the ‘show’ page with the customer details, where we can see that the card has been associated with the customer.
Now we can add some code to test this works correctly.
Step 18) Add these lines to the create_customer_spec.rb file:
expect(page).to have_content(‘New Credit Card’)
fill_in ‘Number’, :with=>’4999488847774666′
select(value=2023, from: ‘exp_date_year’)
select(value=’April’, from: ‘exp_date_month’)
select(value=2, from: ‘exp_date_day’)
fill_in ‘Name on card’, :with=>’S Harrison’
select(value=’Visa’, from: ‘Organisation’)
click_button ‘Create Credit card’
expect(page).to have_content(‘Harrison’)
end
You’ll see that we need to use a number of different selectors for completing the form with its drop-down selectors. When creating these yourself, notice that the ‘:’ shifts between pre and post identifier, and that the order ‘identifier’ followed by value swaps when using selectors too.
Step 19) We can now go back to the travelagent/app/views/customers/show.html.erb page and add some code to loop through the customer’s cards:
<p>
<b>Credit Cards:</b> </p>
<% @customer.credit_cards.each do |cc| %>
<p>
<%= cc.number %>
<%= cc.name_on_card %>
<%= cc.organisation %>
<%= cc.exp_date %>
<%= link_to ‘Edit the card’,edit_credit_card_path(cc.id) %>
</p>
<% end %>
This loop is another variation on the for loop in the style of’for each x do y’. So, for each customer credit card (which wecall ‘cc’ as an alias), return the card’s number, name on the card, organisation (issuer) and expiry date. Notice that we alsouse the ‘end’ statement to show where the loop ends.
Rails knows that ‘credit_cards’ belongs to the customer object, because we told it about them in the model. That is why we canuse the variable ‘@customer.credit_cards’ in the page without having to call it in the customer_controller file.
As noted last week, this is only for demonstration of howyou’d code up such a page, and you’d not really want to showcustomer names and card numbers in such a file over theinternet. This would be a security issue.
Step 20) Our test forthis will be to check for the name on the card, but it couldjust as easily be the organisation name too.
click_button’Create Credit card’
expect(page).tohave_content(‘S Harrison’)
expect(page).to have_content(‘Visa’)
We now have a fully working example. As you see it is possible to code something, write a test for it, and to ensure it runs correctly as you build up your application. Working like this you’ll also know when you break something because you’ll be continually checking that it all works correctly as you build the app in small pieces.
Step 21) There is one last thing to do: Add a link to the menu so that we can ‘List Customers’. Open views/layouts/_menu.html.erb and add this code in bold:
<p><%=link_to ‘Find a Cruise’, cruises_path%> |
<%= link_to ‘Find a Customer’, customers_path%> |
Make a Payment |
With this in place we can now navigate around the site to manage our customers.
On beyond the practical
For more background on using Capybara look at https://www.devmynd.com/blog/setting-up-rspec-and-capybara-in-rails-5-for-testing/and also https://robots.thoughtbot.com/rspec-integration-tests-with-capybarawhich is also covered in this ‘deliberate practice‘ example.
Yes, we can now add in details on the homepage for the Travelagent, and then click through to those to ensure that we can make a reservation and a payment work correctly. I’ll leave that implementation to you using the details on the Capybara site, where under the DSL details you’ll find out how to call those links.
The code above sets you up to use Cucumber with some Capybara scripting of web page interaction. You can also use this more predominantly inside of an RSpec testing scheme as noted in this piece from Thoughtworks.Here the emphasis is on testing some web pages, while also using model, view and controller tests for more specific scenarios.