This practical will put more customers into the application and show their activity in the dashboard we previously created. This will let us scale up parts of the application to see how it copes with more information.
Modifying our seed file to use the customers
Given we have our customers from the last session, we can now generate some random ones, and then use them to book cruises and complete the dashboard to show cruise occupancy.
Step 1) We first create customers and then loop through them to add an address and credit card to each customer using Faker generated data and some random selections from arrays because this is easier to generating dates. Open up lib/tasks/ships.rake and add this code in bold between the other lines.
p “cruises created”
#create customers
3.times do |index |
Customer.create!(
first_name:Faker::Name.first_name,
last_name:Faker::Name.last_name,
has_good_credit: true,
paid: false
)
end
#give each customer an addresses and credit card
customers = Customer.all
customers.each do | customer|
Address.create!(
street:Faker::Address.street_address,
city:Faker::Address.city,
postcode:Faker::Address.postcode,
customer_id: customer.id
)
year = [2020, 2021,2022, 2023]
organisations =[“American Express”, “MasterCard”, “Visa”]
CreditCard.create!(
customer_id:customer.id,
number:Faker::Number.number(12),
exp_date:year.sample.to_s + “/” + Faker::Number.between(1,12).to_s,
name_on_card: customer.first_name + ” ” +customer.last_name,
organisation: organisations.sample.to_s
)
end
p “customers created”
end
Step 2) When it works, then add the lines to remove data first before we generate new ones each time we run the script.The command to run the script is ‘bin/rake ships:seed_cabins’.
#remove the data from the tables before creating new data
#this ensures we have no stray references to objects that no longer exist
Ship.destroy_all
Cabin.destroy_all
Cruise.destroy_all
Address.destroy_all
CreditCard.destroy_all
Customer.destroy_all
p “tables emptied”
#create the ships
With this in place we can now set about creating the navigation to enable staff to book a cruise for customers.
Purchasing a Cruise
We still can’t book a cruise for a customer in the application. We’ve set it up so that a customer can be registered with their name, address and credit cards, but that is all. In order for them to book a cruise they need to have their actions better coordinated in the application. What we need to do is work our way through the application from listing cruises to making reservations.
Step 1) Before we can do this we need to create a reservation and associate it with other models to enable relationships between objects. We can create a reservation object with this command:
bin/rails generate scaffold Reservation customer:references cruise:references
This will generated our objects and set their references to customers and cruises. Then we can complete the migration with the command:
run ‘bin/rails db:migrate’
We now need to make some changes in the controller and views so that a reservation shows the customer and cruise name on the index and show pages, instead of the cruise_id and customer_id values. You also want to be able to select the customer from drop down lists to make it easier. We’ll not worry too much about the cruise being a drop down as we’ll select that from the cruise itself. Just fix the customer part for now. If you don’t remember what to do, then go back to the earlier sessions where we did this in the second and third practical.
Now follow the ‘find a cruise’ link from the home page. This will list the cruises in the application. Select one, and you’ll see that it just gives you the name of the cruise. Not much use.It’d be better to show reservations for the cruise and offer a link to make a reservation.
Step 2) Open app/views/cruise/show.html.erb and you’ll see that there isn’t much there. What we need though is some information about who’s made reservations for this cruise, and a link to make a new reservation for the cruise. The link to the reservation is easy.
<p><%= link_to ‘Add a Reservation’,new_reservation_path(:cruise_id => @cruise) %><p>
Step 3) This will set us up so that we pass the value of the cruise_id to the reservation form. Add this code in bold to the app/views/reservations/_form.html.erb file:
<div class=”field”>
<%= form.label :cruise_id %>
<%= form.hidden_field :cruise_id,:value=>@cruise.id %>
<%= @cruise.name %>
</div>
Step 4) We use the hidden_field so that the cruise value is captured, but can’t be accidentally edited by the person making the reservation. In order for this to work you need to ensure that the controller has the specific cruise. Open app/controllers/reservation_controller.rb and add this code in bold to the ‘new’ method:
def new
@reservation = Reservation.new
@customers = Customer.all
@cruise =Cruise.find(params[:cruise_id])
end
This should now work for you so that you can create a reservation.
Step 5) To make it really clear which cruise is being reserved you can also add this to the top of the form in app/views/reservations/new.html.erb:
<h1>New reservation for the <%= @cruise.name%></h1>
This ensures the person doing the reservation knows they are on the right one.
Step 6) We also need to make use of the relationship where each cruise has many reservations so we can use that code to show us the reservations. Add the code below to app/views/cruises/show.html.erb above the line you just added for the ‘add a reservation’ link.
<h4>Reservations</h4>
<% @cruise.reservations.each do |res|
@customer = Customer.find(res.customer_id)
%>
<p>
<%=@customer.first_name %><%=@customer.last_name %> reserved on<%=res.created_at %>
</p>
<% end %>
The code provides a loop through the reservations for the people on the cruise.
If you’re having problems here, then it could be that you didn’t finish putting in the different relationships into the models. If so, then check that you have these all in place as mentioned here.
The Other Relationships
Step 7) We need to update a few models at this point with information about relationships:
- cruise belongs_to :ship and has_many :reservations
- customer has_many :reservations
- reservation belongs_to :customer and reservation belongs_to:cruise
- ship has_many :cruises
Add these relationships to the models to fill in one’s that you’re missing. Completing these will finish the connections. Rails needs to navigate object relations in the views that we want to show on the pages.
We still need to add cabins to the reservation as our customers will want more than a chair on the deck I’m sure, especially if it’s raining. We’ll do that shortly. Before then we need to do some housekeeping to make that possible.
Has_and_belongs_to_Many Relationships
Even though the reservations is a complex object, Rails lets us deal with it fairly easily. As before we specify the many-to-many relationship in both classes, and then modify the show file. In our travel agency business many cabins will have many reservations.
Step 8) Open up the cabin.rb and reservation.rb files under the app/models directory. Both of these two models interact with each other in that, a cabin is booked on many different reservations, and a reservation can include many different cabins. Dad books a family cruise with one reservation. The reservation has Mom and Dad in one cabin, while the kids go in another. Perhaps, it should be added that this is a little contrived, because it wouldn’t really work the other way, with many reservations being attached to one cabin, unless it was a very large cabin, or that different people were paying for their share of the cabin. So add both of the lines as shown in bold below:
class Cabin < ApplicationRecord
belongs_to :ship
has_and_belongs_to_many :reservations
end
class Reservation < ApplicationRecord
belongs_to :cruise
belongs_to :customer
has_and_belongs_to_many :cabins
end
The code we added says that the two models (cabin and reservation) belong to each other, and they are joined in the table cabins_reservations. As we didn’t specify the table name, then Rails will look for a join table of the two table names in alphabetical order, ie cabins_resevations. Now we need to work out a way to display the cabins booked in each reservation.
Step 9) As before with our has_many code, we need to represent many items at one point in the app/views/reservations/show.html.erb file, which we do with the for loop. This time we loop through the cabin objects as shown in the code below. Add this code after the end of the code displaying the reservation, and before the ‘link_to’ code:
<% @reservation.cabins.each do |cabin|%>
<p> <%= cabin.name %> with
<%= cabin.beds %> beds
on deck <%=cabin.deck%> of the
<%= Ship.find(cabin.ship_id).name%>
</p> <%end%>
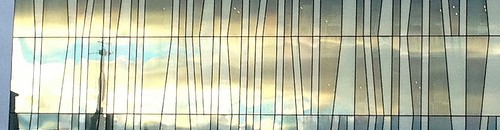
This code should look familiar enough by now. It lets us list the cabins associated with any reservation. You should be able to see this by going to a specific reservation.
Step 10) Oops, we now get the error: “Could not find table ‘cabins_reservations'” so we better create the table with a migration.
bin/rails generate migrationCreateCabinsReservationsJoinTable cabin reservation
As long as we include ‘jointable’ in the migration name, and then specify the models, Rails will create the code for the migration. That means we only need to run the usual command to complete the step and finish the migration.
bin/rails db:migrate
Your page should now load, but not show us any cabins, as we’ve not tied cabins on the ship to a reservation yet.
Now we can modify the ‘new reservation’ view to let us select the cabins which we’d like included in the reservation. But,this would ideally mean that we only see those cabins associated with a particular cruise, which of course, is tied to a particular ship. It would be better if we could specify the cruise, then the cabin, then the customer to make the reservation.
By the way, if you forget to run a migration, then Rails will remind you

Step 11) With the form completed we need to populate the ‘cruise_id’ parameter in the form so that the correct cruise is booked. Open up the the app/controllers/reservations_controller.rb and look at the ‘new’method. The code there creates an instance of a reservation object, but we need more than that to make a complete reservation. To start with we need to have a cruise instance to populate the cruise_id part of the form. We can do that by adding this bold code to the ‘new’ method in the reservation controller.
def new
@reservation = Reservation.new
@cruise =Cruise.find(params[:cruise_id])
@customers = Customer.all
end
That gets us the cruise details. Reload the page, and you should see the cruise name on the page, and the cruise_id populated.
Step 12) Now we need to add the cabins to choose from for the reservation. For simplicity we’ll only allow one cabin to be chosen per reservation. As before we need to add code to the reservation_controller and the _form.html.erb files.
In the reservations_controller method add this line in bold to the end of the ‘new’ method
@customers = Customer.:all
@cabins= Cabin.where([“ship_id = ?”, @cruise.ship_id])
end
This retrieves all of the cabins on the ship that is being used for this cruise. For simplicity, it does NOT exclude those cabins already booked. But given that we have a relationship between reservations and cabins, it would not be too hard to add that functionality. In the code the ? is replaced with the value of @cruise.ship_id as part of the condition, and also makes the code more secure.
Step 13) In the app/views/reservations/_form.html.erbfile add this code in bold to display the cabins with radio buttons for selectors.
<%= @cruise.name %>
</div>
<h4>Pick a cabin on the <%=@cruise.ship.name %> </h4><br style=”font-weight: bold;”><table><br style=”font-weight: bold;”><tr><br style=”font-weight: bold;”><th>Cabin</th><th>Deck</th><th>Beds</th><br style=”font-weight: bold;”></tr><br style=”font-weight: bold;”><% for cabin in @cabins%>
<tr><br style=”font-weight: bold;”><td><%= hcabin.name%></td>
<td><%= hcabin.beds %></td>
<td><%=hcabin.deck %></td>
<td><%=radio_button(‘cabin’, ‘cabin_id’, “#{cabin.id}”)%></td>
</tr><br style=”font-weight: bold;”>
<% end %><br style=”font-weight: bold;”></table>
<p>
<%= f.submit “Create” %>
</p>
<% end %>
This code is the same as for the customer listings, so needs no explanation. Now we can make a reservation. Well almost. We can submit the form, but the reservations_controller doesn’t know what to do with the details that we submit. It would make a reservation, but wouldn’t tie that reservation to a specific cabin for you. We need to make another code change. You can check by looking at the reservations and then looking up the one you just made. It’s not there. We need to fix that.
Step 14) Go to the’create’ method in the reservations_controller. You’ll see standard code to create a reservation instance and to then save it (write it to the database), and to then redirect to browser to the reservation listings. That part is all fine, but we need to add in some code about the cabin that we’ve reserved too, which is part of our reservation and cabin relationship. Change the method by adding (modifying) the lines in bold below.
@reservation =Reservation.new(reservation_params)respond_to do |format|
if @reservation.save
# retrieve the cabin parameter and then add it to the reservation object
cabin_id = params[:cabin]
cabin_id = cabin_id[:cabin_id]
cabin = Cabin.find(cabin_id)
logger.info “cabin: #{cabin.id}”
@reservation.cabins << cabin
@reservation.save
format.html {redirect_to @reservation, notice: ‘Reservation was successfully created.’ }
There are a number of things to note here. First, that we have to retrieve the object from within the form in order to get the value of the cabin_id. Second, we use the logger object to put this info into the server log for debugging in case there are issues with retrieving the correct item from the form.Third, we use the @reservation.cabins << cabin line to add the cabin to the reservation.cabin object array so that it is saved with the reservation.
We should tidy up two parts in the navigation.
Step 15) Open app/views/reservations/index.html.erb andremove the line for ‘New Reservation’. If you click it, then you’ll find it doesn’t work as we’ve set up the ‘new reservation’ from the cruise page, so it expects a cruise_id to work. We should remove this one.
Open app/views/layouts/_menu.html.erb and change the ‘Make a Payment’ line to the following so that payments are done via reservations:
<%= link_to ‘Find a Customer’, customers_path %>|
<%= link_to ‘Find a reservation’,reservations_path %> |
<%=link_to ‘Our ships’, ships_path %> |
This will set us up for the next section where we take payments. Our staff can find a reservation, select it, and then take a a payment on it using the customer’s credit card.
Take payments for reservations
Step 1) We start this part by creating a payment model and its associated table with the following commands:
bin/rails generate scaffold Payment amount:decimal credit_card:references customer:references reservation:references
And then run the migration file to modify the database.
‘bin/rails db:migrate’
Step 2) To make this work we’ll start with the reservation ‘show’ view (app/views/reservations/show.html.erb)and create a link from there to make a payment by the customer.This will mean the only information that we don’t have for the form will be which credit card is being used, and how much the customer wants to pay. Add this code in bold to make the link:
</p> <%end%>
<p><%= link_to ‘Make a payment’, new_payment_path(:reservation_id=> @reservation) %>
</p>
<%= link_to ‘Edit’, edit_reservation_path(@reservation)%> |
Step 3) This will get you to the ‘new’ form for a payment, but we need to work the controller now to make it populate the form with the correct details. Open app/controllers/payments_controller.rb and add this code to the ‘new’ method:
def new
@payment = Payment.new
@reservation =Reservation.find(params[:reservation_id])
@customer =Customer.find(@reservation.customer.id)
@credit_cards =@customer.credit_cards
end
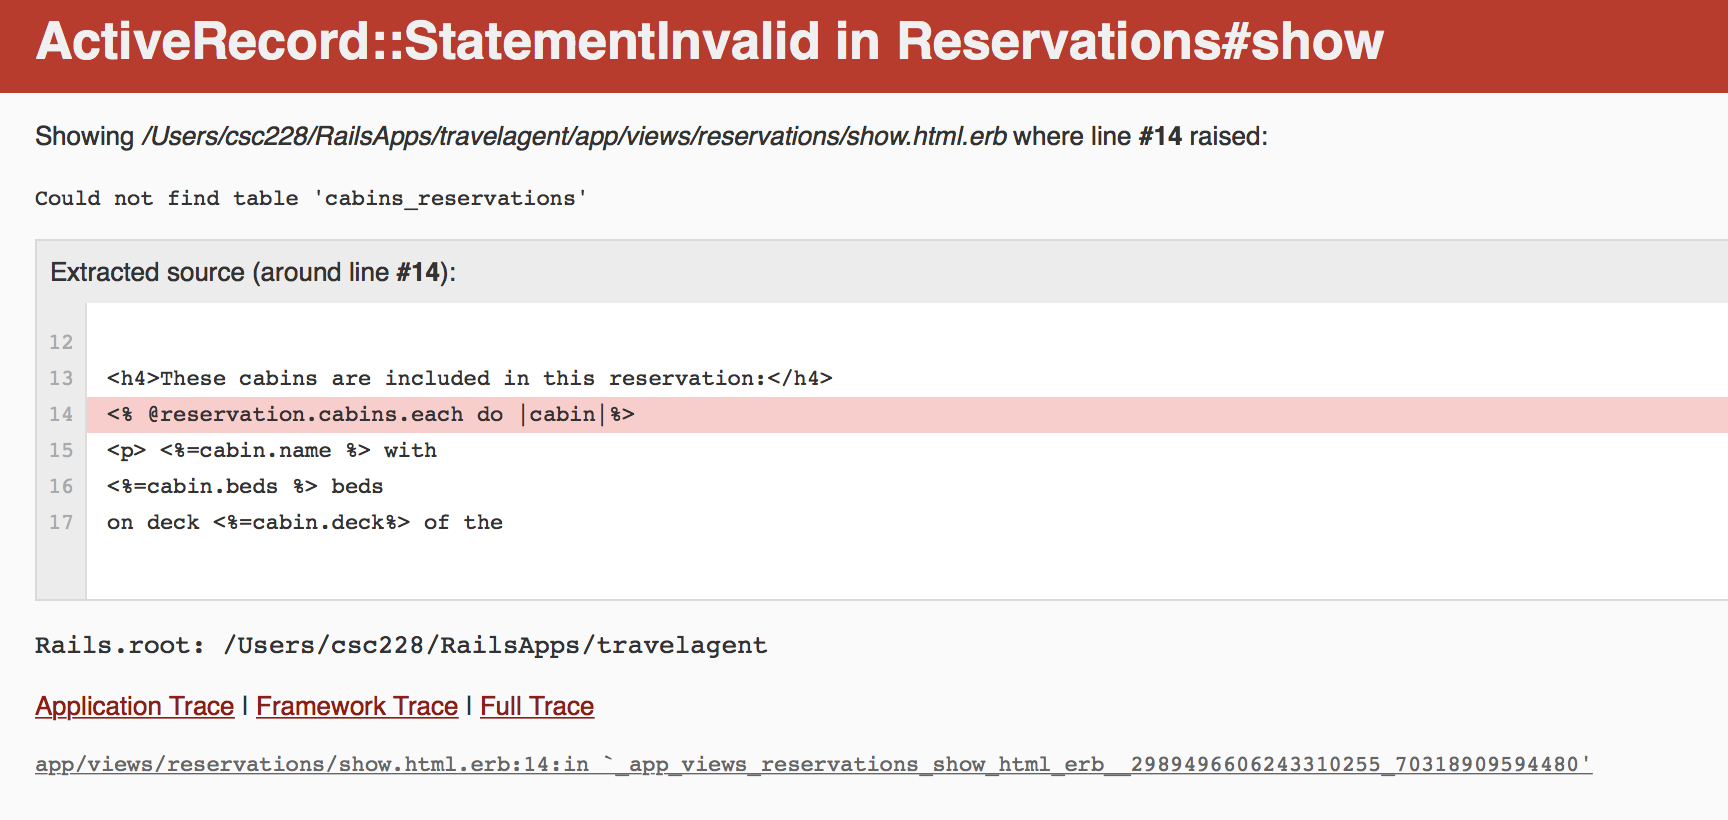
Step 4) This code will pull the details from the reservation to fill in the customer details and the credit card options for that customer. If there is no credit card for the customer, then it will fail. We can do something about thatlater. For now we need to change the details in the app/views/payments/_form.html.erb file as shown below:
Step 5) If you try the form to take a payment, then you’ll find that the ‘show’ payment page shows object references instead of details. We can quickly fix that with a few changes to the app/views/payments/show.html.erb file:
<p>
<strong>Credit card:</strong>
<%= @payment.credit_card.organisation %>
</p>
<p>
<strong>Customer:</strong>
<%= @payment.customer.last_name %>
</p>
<p>
<strong>Reservation Cruise:</strong>
<%= @payment.reservation.cruise.name %>booked on <%= @payment.reservation.created_at %>
</p>
The Payments Relationships
Step 6) As customers are likely to make multiple payments we need to modify our models to ensure that we can navigate payments adequately for our application. Check your models to ensure that these are put in place correctly:
- payment belongs_to :reservation, :credit_card, and :customer
- reservation belongs_to :customer and reservation belongs_to:cruise, and reservation has_and_belongs_to_many :cabins, and reservation has_many :payments
Step 7) We are almost done with the money side. We should modify the ‘index’ page for the payments similar to what we did for ‘show’. Open app/views/payments/index.html.erb file and modify the parts in bold. We also swapped a </td> fora <br> to put all of the reservation details in one cell.
<tbody>
<% @payments.each do |payment| %>
<tr>
<td><%=payment.amount %></td>
<td><%=payment.credit_card.organisation %></td>
<td><%=payment.customer.last_name %></td>
<td><%= payment.reservation.cruise.name%><br>
<%=payment.reservation.created_at %></td>
<td><%=link_to ‘Show’, payment %></td>
<td><%=link_to ‘Edit’, edit_payment_path(payment) %></td>
<td><%=link_to ‘Destroy’, payment, method: :delete, data: { confirm:’Are you sure?’ } %></td>
</tr>
<% end %>
This gets us from a reservation to the payments listings, and from there we can use the ‘new payment’ form. There is still more that we could do with this, but it works well enough for now. We’ll move onto the next part.
Update the Seed File and Dashboard
Step 1) We are now ready to create reservations for our cruises. The biggest change is use of ‘new’ instead of ‘create’ for the reservation so that we can add the data for the join table to the reservation. We also have to work through which cabins on the ship are booked already. However, you’ll notice that we don’t actually do anything with that information.A better version would compare a ‘sample’ cabin against the booked cabin array and reject all until one was found that wasn’t booked. For our small numbers what we have works, but as we scaled this up we’d need to do that. We use ‘find_by_sql’ to call the join table.
p “customers created”
2.times do |index|
reservation =Reservation.new(
cruise_id:cruise.id,
customer_id: customers.sample.id
)
reservation.save
booked_cabins = []
#get list of cabins on the ship
while booked_cabins.empty?
cabins =Cabin.where([“ship_id = ?”, cruise.ship_id])
#determine which ones are already reserved
#we should then remove these from cabins array
#grab one cabin from the array and book it if it’s free
cabin =cabins.sample
cabin_reservation = Cabin.find_by_sql(
“select cabin_id from cabins_reservations where cabin_id =#{cabin.id} “)
if cabin_reservation.empty? == true
booked_cabins << cabin
reservation.cabins << cabin
end
end
reservation.save
end
end
p “reservations created”
end
end
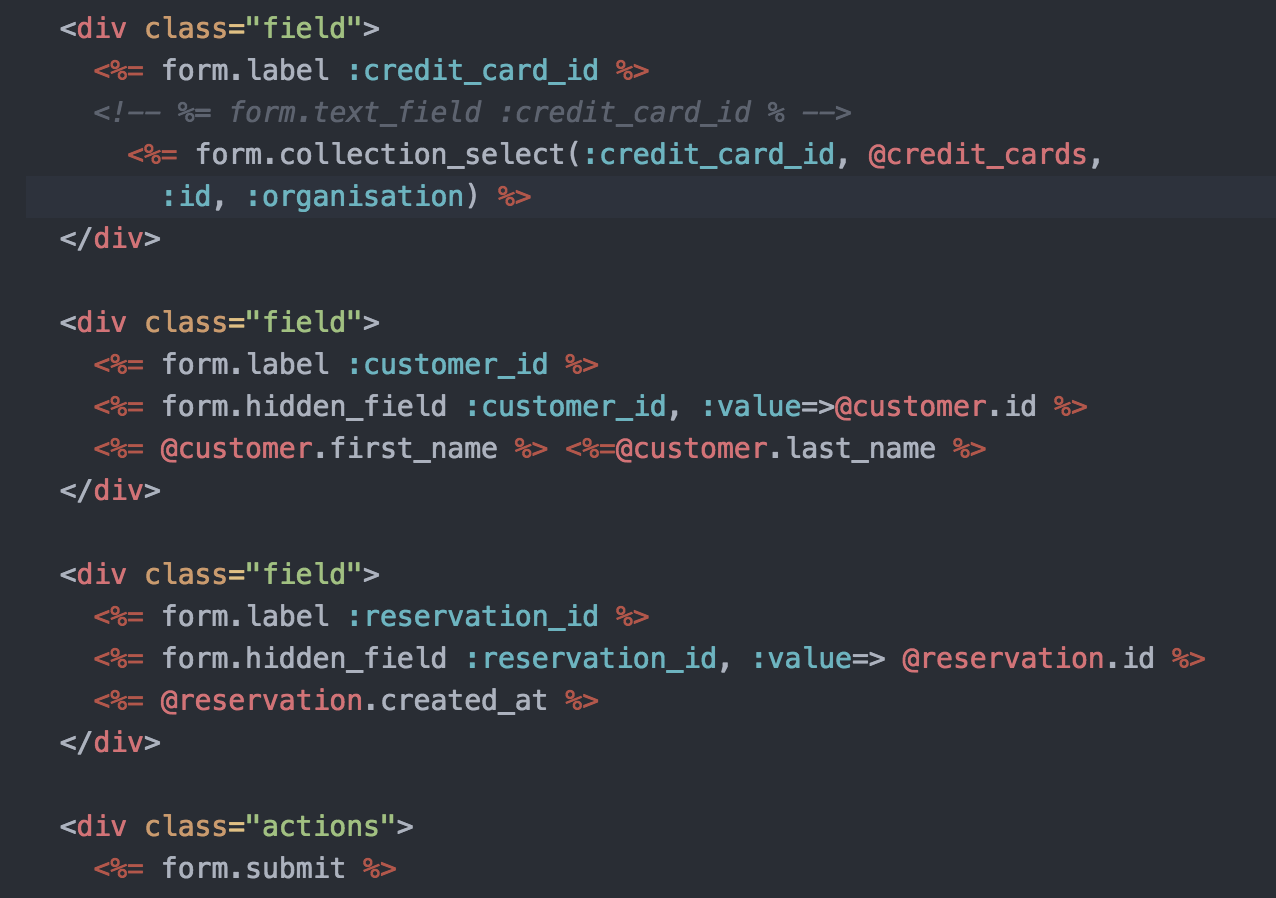
If there are problems running this, then go back and delete any items you created manually, as they might be missing foreign keys to other tables.
Step 2) Lastly, add the line Reservation.destroy_all to clear the data before you generate new ones.
With all of this working we can now develop a dashboard to show occupancy of our cruises.
You can find more about using seeds at https://davidmles.com/seeding-database-rails/.
Modifying our Dashboard
Now we can see how many bookings we have for our cruises. Open app/views/travelagent/index.html.erb.
Step 1) We now need to modify the index.html.erb file by changing some of the labels and variables that we use to make for more useful code.
<script type=”text/javascript”>
$(function () {
var myChart = Highcharts.chart(‘container’,{
chart: {
type: ‘bar’
},
title: {
text: ‘Cruise Bookings‘
},
xAxis: {
categories: <%= raw @cruise_names %>
},
yAxis: {
title: {
text: ‘Cabins Booked‘
},
tickInterval: 1
},
series: [{
name: ‘Cabins Available’,
data: <%= raw @cabins_available %>
},
{
name: ‘Cabins Booked‘,
data: <%= raw @bookings %>
}]
});
});
</script>
This sends the raw values of the array to the file. If you leave off ‘raw’ then you’ll find the UTF values of the quotes, and a blank where the chart should be seen.
You should now be able to run this and see the first three names of your ten cruises. We only see three as we still only have three data points.
Step 2) Our next step is to gather up the values of cabins per cruise, and the number of booked cabins per cruise.This demands some nice SQL to count the number of cabins per ship and then keep those in the same order as the categories.Similarly, we want the number of booked cabins too. We do this in the controller so that we only send the values needed to the view for visualisation.
Add this code to the controller:
class TravelagentController < ApplicationController
def index
@cruises = Cruise.all
@cruise_names = []
@cabins_available = []
@cruises.each do |cruise|
@cruise_names << cruise.name
@cruise_cabins =Cabin.where([“ship_id = ?”, cruise.ship_id]).count(‘id’)
@cabins_available <<@cruise_cabins
end
@reservation_groups =Reservation.all.group(‘cruise_id’).count(‘id’)
@bookings = []
@reservation_groups.each do |group|
@bookings << group[1]
end
end
end
end
We use @booking << group[1] so that we grab the second item in the hash.
Step 3) If you want to see what this hash looks like, then add this line below the </script> tag in your index.html.erbfile and it will display what’s in the variable.
</script>
<p>Reservation_groups: <%= @reservation_groups%></p>
There you have it. A dashboard, which will change as cabins are booked on cruises. You can also see how you could display many other types of data too by exploring the Highchart examples.
Beyond the Practical
Assuming that you might still have some time left, do more work on your assessment site.