Using the telescope and accessories

Using the telescope and accessories
Section summary:
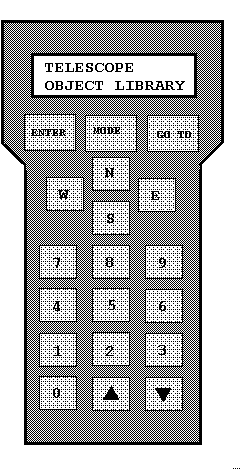
1. The ENTER key is used to select a menu file, a file option, or toedit a value.
2. The MODE key chooses one of the five modes of the LX200, and is used to exit specific menu files.
3. The GO TO key is pressed once an object is selected to slew the telescope to the coordinates of the object.
4. Direction keys are N,S,E and W.
5. Speed keys are 0,1,4 and 7 and control the slew speed of the telescope with 7 being fastest and 0 being slowest.
6. Key 8 is for changing the brightness and pulse rate of the optional illuminated recticle eyepiece.
7. Key 5 is for focusing with the optional electric focuser.
8. Key 2 turns on and off the red LED flashlight that is located at the top of the keypad.
9. Keys 9,6 and 3 are object keys and are used to select between catalogues.
10. The two arrow keys at the bottom are used to scroll up and down through the menus.Both telescopes in the observatory offer interchangeable eyepieces. Each eyepiece has certain characteristics which will determine the magnification and the field of view you get from the telescope.
The magnification of the telescope depends on the focal length of the telescope (which is always fixed) and the focal length of the eyepiece being used. For example if we use the 10" LX200, which has a focal length of 2500mm, along with a 26mm eyepiece we achieve a power of 96x. If however we were to use the same eyepiece with the 8" scope (focal length = 2000mm) then the power would be 77x.
To calculate the power you will get from any eyepiece you simply divide the focal length of the telescope by the focal length of the eyepiece, using the same units to measure both.
Field of view can be confusing. Each eyepiece has an inherent property called the image field of view, which is not to be confused with the actual field of view of the objects you will see through the telescope. Taking the same example again, the 26mm eyepiece which gave a power of 96x with the 10" scope has an image field of 52 degrees. This gives an object field of view of 0.54 degrees with the LX200 and 0.68 degrees on the 8" scope.
The actual (i.e. object) field of view of a telescope with a given eyepiece is the image field divided by the power obtained using that eyepiece.
It can be easily seen that the higher power the smaller the actual field of view. This must be considered when viewing different objects. Some objects require relatively low magnifications to get the entire object in the field of view. As you move to higher magnifications, objects also become dimmer and the crispness of the image can also deteriorate due to atmospheric disturbances. All these factors should be taken into account when choosing an eyepiece to view an object.
Below is a list of the eyepieces we have available at the observatory along with their associated powers with each telescope and the corresponding object fields of view.
We also have a zoom eyepiece which ranges in focal length from 8mm to 24mm with a fixed apparent field of 52 degrees. This gives a range of power from 104x to 312x with the LX200 and an actual field ranging from 0.5 degrees to 0.17 degrees.
Having the observatory in the city is not the best location, though we do have the links and the sea to the East of us. Background light pollution can greatly affect viewing and makes tasks like long exposure photography virtually impossible unless filters are used to suppress streetlighting. Using a filter we can block out a large amount of light pollution such as sodium light from street lights. Filters are especially effective for viewing detail in deep space emission and reflection nebulae. Here is a list of filters that the observatory has available, along with a brief explanation of their uses:
- Broadband Filters - These filters are designed to stop only the light pollution most common in cities, allowing all other light to pass including nebula emissions.
- Narrowband Filters - These filters are slightly more specialized in that they allow only three of the most important visible wavelengths to pass. These are the two spectral lines of Oxygen III at 496 and 501nm and the Hydrogen Beta line at 486nm. These filters are designed for viewing deep space emission nebulae.
- Oxygen III Filter - Another extremely specialized filter for viewing faint planetary and diffuse nebulae. These filters often yield better quality images in a light polluted area than under dark skies without the filter.
- Solar Filter - Looking at the sun through a telescope would blind you (even a glimpse) and likely ruin the precise shape of the mirror. By using a solar filter we can safely but cautiously, view and photograph the sun.
The 10" LX200 telescope has adapters for those who wish to try astrophotography, if you have your own 35mm camera you can bring it along and attach it to the telescope. Film astrophotography is a challenging goal and although simple enough to get started it is a very difficult medium to master. The observatory is also equipped with an extremely sophisticated CCD camera. Learning how to use the camera correctly and to its full potential may take some time but the rewards do show in comparison to film photography.
The observatory has a set of exposure tables for film photography which will help as a rough guide in photographing a whole range of objects. Please note that deep sky photography on film is very time consuming and it is recommended that those pursuing this field familiarize themselves with the CCD camera, after all that's what it is there for!
|
|
Film speed (ISO) |
|||||||
|
Object |
25 |
50 |
100 |
200 |
400 |
800 |
1600 |
3200 |
|
Moon (thin crescent) |
1/2s |
1/4s |
1/8s |
1/15s |
1/30s |
1/60s |
1/125s |
1/250s |
|
Moon (wide crescent) |
1/4s |
1/8s |
1/15s |
1/30s |
1/60s |
1/125s |
1/250s |
1/500s |
|
Moon (quarter phase) |
1/8s |
1/15s |
1/30s |
1/60s |
1/125s |
1/250s |
1/500s |
1/1000s |
|
Moon (gibbous) |
1/15s |
1/30s |
1/60s |
1/125s |
1/250s |
1/500s |
1/1000s |
1/2000s |
|
Moon (full) |
1/30s |
1/60s |
1/125s |
1/250s |
1/500s |
1/1000s |
1/2000s |
1/4000s |
|
Moon (earthshine) |
9m |
5m |
2-4m |
55s-2m |
35s |
20s |
8s |
4s |
|
Sun (filtered) |
1/250s |
1/500s |
1/1000s |
1/2000s |
1/4000s |
1/8000s |
<< |
<< |
|
Mercury |
1/15s |
1/30s |
1/60s |
1/125s |
1/250s |
1/500s |
1/1000s |
1/2000s |
|
Venus |
1/250s |
1/500s |
1/1000s |
1/2000s |
1/4000s |
1/8000s |
1/8000s |
<< |
|
Mars |
1/30s |
1/60s |
1/60s |
1/125s |
1/250s |
1/500s |
1/1000s |
1/2000s |
|
Jupiter |
1/8s |
1/15s |
1/30s |
1/60s |
1/125s |
1/250s |
1/250s |
1/500s |
|
Saturn |
1/2s |
1/4s |
1/8s |
1/15s |
1/30s |
1/60s |
1/125s |
1/250s |
|
Uranus |
3s |
2s |
1s |
1/2s |
1/4s |
1/8s |
1/15s |
1/30s |
|
Neptune |
7s |
3s |
2s |
1s |
1/2s |
1/4s |
1/8s |
1/15s |
|
Comets (typical) |
>> |
>> |
1-4h |
35m-2h |
20m-1h |
10-45m |
5-25m |
2-12m |
|
Nebulae (bright) |
>> |
1-4h |
35m-2h |
20m-1h |
10-45m |
5-25m |
3-12m |
1-6m |
|
Nebulae (faint) |
>> |
>> |
>> |
>> |
>> |
>> |
>> |
>> |
|
Galaxies (cores) |
>> |
>> |
>> |
>> |
>> |
30m-3h |
15m-2h |
8-55m |
|
Galaxies (outer) |
>> |
>> |
>> |
>> |
>> |
>> |
>> |
>> |
|
Observatory |
|
Homepage |
